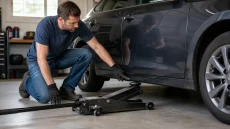
Quick answer: Park on a firm, level surface, secure the vehicle, confirm the lift and support points in its owner or service manual, and use a jack with enough rated capacity. Raise the vehicle only high enough to place correctly rated jack stands, lower it onto those stands, and test stability before beginning work. Never put any part of your body under a vehicle supported only by a hydraulic jack.
A floor jack is a lifting device, not a long-term support. The safe sequence is therefore prepare, lift, support, verify, work, and lower. If the ground is soft, the lifting point is unclear, the jack leaks, or the vehicle cannot be secured against movement, stop and use a professional lift.
What you need before lifting
- A floor jack whose label is readable and whose rated capacity suits the job.
- A matched pair of jack stands with enough rated capacity and a usable height range.
- Wheel chocks that fit the tires and grip the working surface.
- The vehicle owner or service manual showing approved lifting and support points.
- A firm, level work area away from traffic, slopes, loose gravel, and damaged asphalt.
Do not select a lifting point by appearance alone. A pinch weld, subframe, differential, axle, battery enclosure, or suspension component may or may not be approved on a particular vehicle. Start with our guide to finding the correct jacking points, then confirm the answer in the manual for the exact model and year.
Pre-lift decision table
| Check | Continue when | Stop when |
|---|---|---|
| Surface | Clean, hard, level, and able to carry the load | Sloped, soft, broken, or likely to let wheels or stands sink |
| Jack | No leak, bent part, missing hardware, or abnormal motion | The jack creeps down, binds, leaks, or has an unreadable rating |
| Lift point | Specified by the vehicle manufacturer | You are guessing from a nearby seam or panel |
| Support | Stand points remain accessible after the jack is positioned | The jack blocks every approved support point |
| Vehicle systems | Parking brake and required service/jack mode are set | Air suspension or self-leveling behavior is not understood |
How to use a floor jack safely
1. Prepare the work area
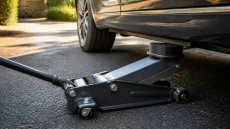
Clear tools, cords, and loose material from around the vehicle. Work on concrete or another hard, level surface. If you are working on asphalt, read our guide to using a floor jack on asphalt; warm or damaged asphalt can allow wheels and stands to sink.
2. Secure the vehicle
Switch off the engine unless a model-specific procedure explicitly requires otherwise. Put an automatic transmission in Park or a manual transmission in the gear specified by the owner’s manual, set the parking brake, remove occupants, and chock the wheels that will remain on the ground. For a tire change, the diagonally opposite wheel is a common chock position, but follow the vehicle manual.
3. Inspect the jack and stands
Check the saddle, wheels, handle, release mechanism, frame, welds, and visible hydraulic parts. Test the jack without a vehicle: it should rise smoothly, hold briefly, and lower in a controlled way. Inspect stands for bent legs, damaged teeth or pins, cracked welds, missing retainers, or labels that no longer identify their capacity.
4. Position the saddle under the approved lift point
Roll the jack so the saddle is centered beneath the specified point. The saddle must contact a load-bearing surface, not a plastic cover, floor pan, fuel tank, exhaust part, battery enclosure, or unapproved seam. Use only a pad or adapter designed for both the vehicle point and the jack saddle.
5. Raise slowly and watch alignment
Close the release valve according to the jack manual and pump in smooth strokes. Pause as the saddle first takes weight. Confirm it remains centered and that the jack can roll slightly as the lift geometry changes. Stop if the vehicle shifts, the saddle tilts, a wheel lifts unexpectedly, or the surface begins to deform.
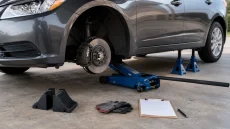
6. Place the jack stands
Raise only high enough to fit the stands at the manufacturer-approved support points. Set both stands to equal height when supporting the same end of the vehicle. Center each saddle and fully engage its locking mechanism. Our jack-stand selection guide explains capacity, height, base, and saddle fit.
7. Transfer the load and verify stability
Lower the jack slowly until the vehicle rests on the stands. Keep the jack close to the lift point as a non-load-bearing backup if its manufacturer permits, but never treat it as the primary support. From outside the vehicle, apply a modest push at a strong body area. If anything moves, creaks, tilts, or settles, raise the vehicle and reset the supports.
8. Lower the vehicle in control
Remove tools and people from beneath the vehicle. Raise just enough to unload the stands, remove them, then open the release valve gradually. Watch all four corners and keep hands and feet away from the wheels, jack linkage, and pinch zones. Once the tires are fully on the ground, remove the jack and chocks.
Floor jack, scissor jack, or recovery bag?
- Floor jack: the usual choice for controlled lifting on a hard, level garage surface.
- Vehicle scissor jack: generally intended for the emergency tire-change procedure described in that vehicle’s manual. See how to use a scissor jack.
- Inflatable recovery jack: a specialized recovery tool for terrain such as sand, mud, or snow—not a support for working underneath. See our inflatable-jack guide.
Common mistakes to avoid
- Working under a vehicle while the hydraulic jack is the only support.
- Using an unverified center point because it looks strong.
- Putting stands under thin sheet metal or at a point needed by the jack.
- Exceeding the jack’s travel stop or adding improvised height with unstable blocks.
- Assuming that Park or the parking brake prevents every wheel from moving.
- Lifting an EV or air-suspension vehicle without checking for a required jack/service mode.
For a compact pre-job check, use our floor-jack safety checklist. If you specifically need a front-center lift, follow the additional decision steps in how to jack up a car from the front.
Sources and safety basis
- OSHA 29 CFR 1910.244—rated capacity, firm foundation, immediate blocking/support, inspection, and removal of defective jacks from service
- Manufacturer owner-manual example hosted by NHTSA—firm level surface, wheel chocking, approved positions, and no work under a jack-only vehicle
This guide provides a general decision process. The instructions and lift-point diagrams for your exact vehicle, jack, stands, and adapter take priority.