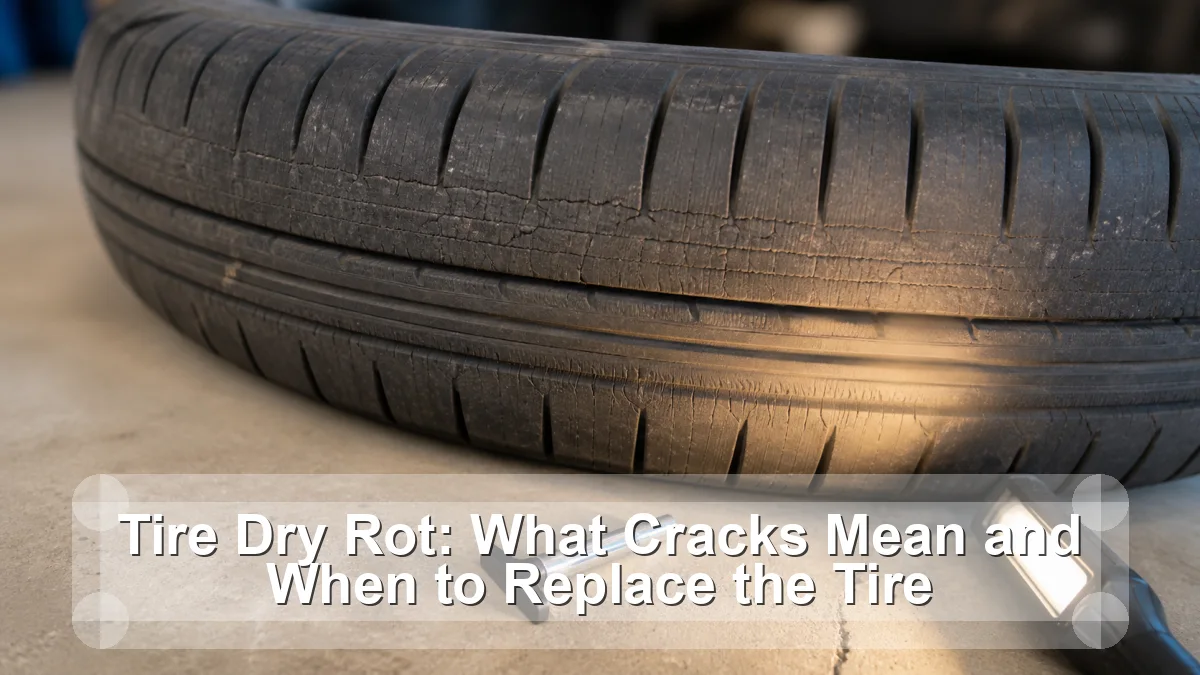
“Dry rot” usually describes weather checking and age-related rubber deterioration. Fine surface lines and deep cracks are not equivalent, but no photo or fingernail test can certify the internal structure. Cracks accompanied by bulging, exposed cords, repeated air loss, vibration, or advanced age call for immediate professional inspection and often replacement.
This guide is a diagnosis and decision aid for a home-garage owner, not a claim that one symptom proves one failed part. Vehicle design, service limits, warning behavior, and test conditions vary, so the exact owner manual and service information remain the final authority.
Read the pattern before choosing a part
The fastest useful move is to describe what changed, when it happens, and what does not happen. The table below is a triage card: it narrows the next check but deliberately avoids turning a clue into a verdict.
| What you notice | What it suggests | Best next move |
|---|---|---|
| Fine surface checking | Early weathering may be present | Age and full inspection still matter |
| Deep cracks open under slight flex | More advanced deterioration | Professional inspection before use |
| Cords or belt are visible | Structure is exposed | Remove from service |
| Bulge accompanies cracking | Internal separation is possible | Do not drive |
| Spare looks unused but is old | Low mileage did not stop aging | Follow age guidance |
Use several matching clues. One reading, one noise, or one dashboard lamp can be affected by temperature, recent service, battery state, road conditions, or the way the vehicle’s control system is designed.
A practical check sequence
- Clean only enough to see. Use mild soap and water if needed; heavy shine products can hide cracks. Do not use solvents that attack rubber.
- Inspect all surfaces. Turn steering for access where safe and use a light. Inner sidewalls are easy to miss and may show curb or suspension damage.
- Check age and history. Decode the final four DOT digits, review storage and climate, and look for long underinflation or prolonged outdoor exposure.
- Separate cosmetic from structural clues. Depth, location, exposed reinforcement, bulging, pressure loss, and vibration carry more weight than the count of fine surface lines.
- Get the right decision. A tire professional should remove the tire if internal inspection is needed. Follow manufacturer age and damage limits rather than a generic internet photo.
Write the observations down. A short record of conditions, readings, warning lamps, and recent work is more valuable to a technician than a replacement-part theory. If a test requires bypassing a safety system, opening a pressurized circuit, working near moving parts, or lifting beyond your equipment, stop at the observation stage.
Crack-location and urgency inspection map
The table and ordered checks above form the article’s working value object. To use it, circle the row that most closely matches the complaint, complete the next check, then revise the hypothesis. A result that contradicts the first guess is progress: it prevents a good component from being replaced and keeps the real fault visible.
Add three lines to the worksheet: conditions (cold, hot, wet, speed, load), evidence (measurement, code, wear, leak, sound), and decision (safe to monitor, book inspection, or stop and tow). That simple structure makes the diagnosis repeatable without pretending every vehicle shares one specification.
Common wrong turns
The tempting shortcut
Tire shine cannot restore lost structural strength. A safe repair plan should explain both the failed condition and the evidence that ruled out its closest look-alikes.
The misleading assumption
Low mileage does not stop heat, oxygen, sunlight, and time from aging rubber. A safe repair plan should explain both the failed condition and the evidence that ruled out its closest look-alikes.
The incomplete repair
Inspecting only the visible outer sidewall misses damage on the inner face. A safe repair plan should explain both the failed condition and the evidence that ruled out its closest look-alikes.
When to stop
Remove the tire from service for exposed reinforcement, a bulge, tread separation, rapid pressure loss, deep spreading cracks, or a new vibration. Use an approved spare or roadside assistance. Do not crawl under the vehicle or rely on a jack alone to inspect an inner sidewall.
When the decision is “stop,” do not let schedule or convenience turn it back into “drive carefully.” Secure the vehicle away from traffic, use hazard warnings where appropriate, and arrange roadside or workshop help. Safety-critical faults can change faster than a symptom list suggests.
Related guides
- How Often Should You Replace Your Tires? Tread, Age, and Damage
- How to Check Tire Pressure Correctly: A Cold-Tire Routine
- Floor Jack Safety Checklist
These links are selected for the next safe decision rather than for keyword repetition. They cover the closest supporting check, tool, or workshop-safety step available before this article’s publication date.
Frequently asked questions
Can dry rot be repaired?
Cosmetic products do not reverse aged rubber or restore internal strength. A damaged or over-age tire is replaced, not rejuvenated.
Why do low-mileage tires crack?
Sunlight, ozone, heat, storage, pressure history, and time continue to affect rubber even when tread is not worn away.
Are tiny sidewall lines always dangerous?
Not every fine line means immediate failure, but depth cannot be judged casually. Age, location, pressure loss, bulging, and maker guidance determine urgency.
Sources
- NHTSA TireWise: pressure, tread, aging, damage, and TPMS guidance
- NHTSA: cold-pressure, tread, age, and road-trip tire checks
Bottom line: “Dry rot” usually describes weather checking and age-related rubber deterioration. Fine surface lines and deep cracks are not equivalent, but no photo or fingernail test can certify the internal structure. Cracks accompanied by bulging, exposed cords, repeated air loss, vibration, or advanced age call for immediate professional inspection and often replacement. Use the evidence path, respect the stop conditions, and confirm the exact repair against vehicle-specific information.